Transforming a dull, underutilized backyard into a luxurious personal retreat is one of the most rewarding investments you can make as a homeowner. A well-designed outdoor space fundamentally changes how you live, relax, and entertain. It extends the functional square footage of your property, providing a private sanctuary for morning coffee, a dynamic entertainment hub for summer barbecues, and a tranquil escape from the relentless pace of modern life. Furthermore, a beautifully executed exterior transformation yields an incredibly high return on investment, significantly boosting your property’s overall market value.
However, achieving this dream is rarely a simple undertaking. A full-scale backyard transformation involves juggling municipal permits, sequencing multiple specialized trades, and managing massive, messy disruptions to your daily life. Without a strict roadmap and an understanding of construction phasing, it is incredibly easy for budgets to spiral out of control and for timelines to extend from a few manageable weeks into several frustrating months. The anxiety of staring at a yard full of mud and half-finished projects is a common pain point for homeowners who attempt to wing it.
The solution to this chaos is a master-planned, logically sequenced approach. Going from demolition to completion requires adhering to a strict order of operations so that underground plumbing work does not ruin newly finished surface work, and heavy machinery does not crack your freshly poured patios.
This comprehensive guide will walk you through the five critical phases of building an outdoor oasis. We will provide actionable tips for avoiding common construction traps, hiring the right professionals in the correct order, and seamlessly blending functional infrastructure with a stunning, cohesive final design.
Phase 1: Clearing the Canvas and Prepping the Ground
Before you can build the future, you must clear away the past. The first phase of any major exterior renovation is inherently messy, loud, and disruptive. However, it is also the most critical step for ensuring the long-term structural integrity of your new oasis. Mistakes made during the demolition and grading phase will haunt the project forever, leading to cracked foundations, severe water damage, and failing retaining walls.
Executing a Safe and Systematic Site Tear-Down
When staring at an old, cracked patio, a rotting wooden deck, or an overgrown thicket of dying trees, the temptation is often to rent a sledgehammer and a dumpster and tackle the tear-down yourself over a weekend. This is almost always a mistake. Backyard demolition is incredibly physically demanding and fraught with hidden dangers. You are dealing with heavy reinforced materials, potential hazardous waste, and an intricate web of subterranean utilities.
Before a single shovel hits the earth, the property must be thoroughly mapped. Utility locators must be called to mark out underground gas lines, electrical conduits, and municipal water mains. A severed gas line is not just a costly delay; it is a lethal hazard. Furthermore, older properties often hide unpleasant surprises beneath the surface, such as abandoned septic tanks, massive buried concrete footings from previous structures, or asbestos siding on dilapidated storage sheds. Bringing in specialized local demolition contractors is vastly safer and more cost-effective than a DIY approach. These professionals have the heavy machinery required to cleanly extract deep root systems and break up reinforced concrete without causing seismic vibrations that could crack your home’s primary foundation.
To ensure a smooth and safe demolition phase, strictly adhere to the following checklist:
-
Always initiate a public utility locate request (such as calling 811 in the US) at least a week before the heavy machinery arrives.
-
Cap and seal all existing irrigation lines at the main valve to prevent accidental flooding when the old sprinkler heads are inevitably ripped out by excavators.
-
Create a dedicated, fortified staging area for the construction dumpsters. Place heavy wooden boards under the dumpster wheels to prevent them from gouging your driveway asphalt.
-
Install temporary, high-visibility construction fencing to keep children, pets, and neighbors away from the hazards of the active tear-down site.
Grading the Soil for Optimal Drainage and Foundation Stability
Once the debris is cleared, you are left with a raw expanse of dirt. What happens to this dirt dictates the lifespan of your future oasis. Water is the ultimate enemy of any hardscape or architectural feature. If the soil is not pitched correctly, rain and snowmelt will flow toward your home, causing flooded basements, or pool underneath your new patios, causing catastrophic frost heave during the winter months.
Proper grading involves manipulating the topography of the yard to ensure that water flows away from all structures and toward designated municipal storm drains or heavily planted absorption zones. This often involves creating subtle swales (shallow drainage channels) or installing deep French drains wrapped in landscaping fabric before any surface materials are brought in. Additionally, the soil that will eventually support your patios and retaining walls must be aggressively compacted. Working with an experienced excavating contractor ensures that the subsoil is manipulated and compacted to the exact specifications required by local building codes, preventing your massive investments from settling and cracking a year down the road.
Before moving to the building phase, ensure your site prep includes these critical steps:
-
Shoot the elevations of the entire yard with a laser level to guarantee a minimum slope of one inch every four feet away from the home’s primary foundation.
-
Trench and lay all deep PVC sleeves that will eventually house your future electrical wires, gas lines, and pool plumbing. Doing this now prevents having to dig under finished concrete later.
-
Remove and stockpile the nutrient-rich topsoil in a designated corner of the yard. You will need this dirt later for the final planting phase, and saving it now prevents you from having to buy it back later.
-
Require a visual inspection of the compacted subgrade by a structural engineer if you are planning to build massive, heavy features like multi-story masonry fireplaces.
Phase 2: Laying the Groundwork and Structural Footprints
With the canvas cleared and the earth perfectly contoured to manage water, your project transitions from destruction to construction. This phase focuses on establishing the heavy, permanent surfaces that will serve as the structural bones of your outdoor living space. These foundational elements dictate the geometry and flow of your entire yard.
Pouring Durable Foundations for Heavy Structures
The structures that make an outdoor oasis truly luxurious—such as massive timber pergolas, sprawling outdoor kitchens, masonry fire features, and raised dining platforms—carry an immense amount of dead weight. You cannot simply build these features directly on top of loose soil or thin decorative pavers. They require heavily engineered, steel-reinforced foundational footings.
The depth and thickness of these footings are entirely dependent on your local climate. In regions that experience freezing temperatures, the footings must be dug below the local frost line; otherwise, the natural expansion and contraction of frozen groundwater will heave the structure upward, cracking the masonry and warping wooden support beams. When pouring these vital slabs, it is highly recommended to partner with dedicated concrete contractors early in the process. They understand the complex chemistry of cement hydration, the necessity of utilizing heavy-duty rebar grids for tensile strength, and the precise curing times required before the heavy vertical construction can safely commence.
When establishing your structural footprints, verify that the following protocols are followed:
-
Ensure all monolithic slabs are poured over a thick, heavily compacted base of crushed gravel to provide capillary breaks that stop moisture from wicking up from the soil.
-
Integrate heavy-duty, galvanized steel post bases directly into the wet cement where your pergola or pavilion columns will eventually sit, preventing future wood rot.
-
Require the installation of expansion joints at regular intervals across large slabs to dictate exactly where the material will crack as it naturally shrinks, keeping the visible surface pristine.
-
Do not rush the curing process. Wait a minimum of seven to ten days before allowing heavy equipment or masons to begin building upon the newly poured foundations.
Selecting the Right Materials for Walkways and Driveways
The pathways in your backyard do more than just get you from point A to point B; they connect the different functional “zones” of your oasis, such as leading guests from the back door to the pool, or from the outdoor kitchen to the secluded fire pit. The materials you select for these transitional areas must perfectly balance aesthetic appeal with slip resistance, longevity, and climate compatibility.
Homeowners generally choose between three primary hardscape materials. Stamped and colored cement offers vast customization but requires regular sealing. Natural flagstone or bluestone provides an unmatched, organic, high-end look but can be notoriously difficult to level perfectly. Interlocking pavers are incredibly durable, flex with temperature changes without cracking, and allow for easy spot repairs. Whichever aesthetic you prefer, you must work closely with specialized paving contractors to ensure the installation is flawless. The secret to a perfect walkway is never the surface material itself; it is the invisible, highly compacted layers of jagged base rock and leveling sand hidden beneath it that prevent unsightly weed growth and sinking.
To achieve flawless, long-lasting pathways, focus on these critical installation details:
-
Select surface materials with a textured, slip-resistant finish, especially for any walkways that border a pool deck or a frequently irrigated lawn.
-
Install rigid edge restraints (made of aluminum or heavy-duty plastic) along the borders of all paver walkways to lock the stones in place and prevent outward migration over time.
-
Utilize polymeric sand to fill the joints between pavers or flagstones. When activated with water, this specialized sand hardens like mortar, locking out aggressive weeds and ant colonies.
-
Design the pathways with gentle, sweeping curves rather than rigid 90-degree angles to create a more organic, relaxing flow through the landscape.
Phase 3: Designing and Installing Aquatic Features
For many homeowners, the ultimate crowning jewel of an outdoor oasis is a custom aquatic feature. Whether it is a sprawling resort-style pool, an intimate, heavily jetted spa, or a modern, minimalist reflecting pond, water brings unparalleled tranquility and entertainment value to a property. However, it is also the most complex, expensive, and invasive phase of the entire build.
Choosing the Perfect Layout for Your Water Feature
Positioning a pool or hot tub is a delicate balancing act of municipal law, solar geometry, and aesthetic design. You cannot simply dig a hole wherever the yard looks emptiest. Municipalities enforce strict setback requirements, dictating exactly how far the water’s edge and the noisy mechanical equipment must be from your property lines and your home’s foundation. Furthermore, the orientation of the pool should maximize southern and western sun exposure to naturally heat the water and provide warmth for sunbathers late into the afternoon.
Beyond positioning, you must select the structural material of the basin. Vinyl liner pools offer the lowest barrier to entry but require liner replacements every decade. Fiberglass shells are incredibly fast to install and highly resistant to algae, but their shapes are limited to what can be transported on a highway flatbed. Gunite (shotcrete) offers limitless customization in shape, depth, and built-in features like tanning ledges and swim-up bars, but requires the longest construction timeline. Because this is a massive permanent investment, evaluating bids from reputable swimming pool contractors should involve deep diligence. Do not just look for the lowest price; physically visit their past projects and speak with previous clients regarding the company’s communication, warranty fulfillment, and strict adherence to timelines.
When planning your aquatic layout, keep these strategic elements in mind:
-
Designate a specific “dry zone” on the pool deck for lounging furniture that receives optimal sun, completely separate from the active, high-splash zones near diving boards or slides.
-
Verify that your planned pool depth complies with safety regulations if you intend to install diving boards or high jump rocks.
-
Map out the sightlines from your home’s primary interior living spaces. The pool should serve as a stunning visual centerpiece even when you are inside looking out the window.
-
Review your local safety codes regarding perimeter fencing and self-closing, self-latching gates, which must be installed before the pool can legally be filled with water.
Sequencing the Plumbing and Basin Installation
Building a custom water feature requires a symphony of heavy trades. Excavators dig the massive hole, steelworkers tie the intricate rebar cage, plumbers lay hundreds of feet of pressurized PVC, and electricians run high-voltage lines for heaters and low-voltage lines for underwater LED lighting. If these trades are not sequenced perfectly, the project will grind to a halt. The plumbing and electrical conduits must be pressure-tested and buried deep within the trenches before the surrounding deck can be poured.
The mechanical heart of your pool—the pump room—must also be strategically mapped out. This area houses the variable-speed circulation pumps, massive cartridge filters, gas heaters, and automated chemical feeders. It should be positioned close enough to the pool to prevent hydraulic friction loss in the pipes, but far enough away or acoustically shielded so the hum of the machinery does not ruin the tranquility of your lounging areas. Working with dedicated swimming pool contractors guarantees that this complex hydraulic engineering is handled correctly. They will calculate the exact turnover rate required for your water volume, ensuring your pumps run efficiently, your utility bills remain low, and your water stays crystal clear.
To ensure a seamless aquatic installation, enforce these sequencing and mechanical standards:
-
Demand a 48-hour pressurized hold test on all underground plumbing lines before they are buried to absolutely guarantee there are no hidden leaks in the joints.
-
Sequence the installation of the pool coping (the decorative edge immediately surrounding the water) before the expansive pool deck is poured, ensuring a seamless, watertight transition.
-
Upgrade to an automated, smart-home compatible control panel, allowing you to turn on the spa heater, activate the sheer descent waterfalls, and change the lighting colors directly from your smartphone.
-
Follow the curing protocols for gunite and plaster rigorously. The interior plaster finish requires a specific, multi-day chemical balancing and brushing routine immediately after filling to prevent permanent staining.
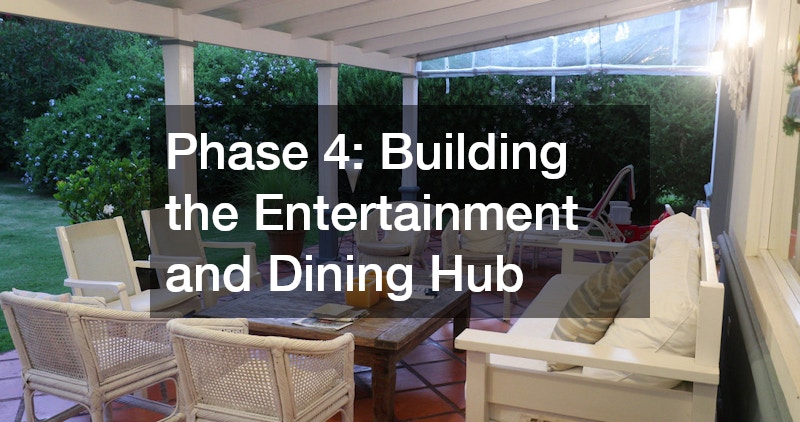
Phase 4: Building the Entertainment and Dining Hub
With the aquatic features curing and the hardscape pathways laid, attention shifts to the social center of the yard. An outdoor oasis is meant to be shared. Building a dedicated entertainment and dining hub allows you to host family dinners, cocktail parties, and neighborhood gatherings without constantly running back and forth into the main house.
Designing a Weatherproof Al Fresco Cooking Zone
The concept of the outdoor kitchen has evolved far beyond a standalone charcoal grill on a wooden deck. Modern outdoor culinary spaces rival luxury interior kitchens, featuring massive built-in gas grills, flat-top griddles, outdoor pizza ovens, dedicated beverage centers, and extensive prep counters. However, bridging the gap between high-end interior design and rugged exterior durability requires meticulous planning.
Every single component in this zone must be engineered to withstand torrential rain, blistering UV rays, and freezing snow. Cabinetry must be constructed from marine-grade polymer or powder-coated stainless steel, rather than the particleboard used indoors. Countertops must be thick natural stone or poured concrete that won’t warp or fade. Furthermore, executing this vision safely requires specialized outdoor kitchen contractors who understand how to waterproof exterior electrical outlets (GFCI), run heavy-duty gas lines directly to the appliances, and install powerful ventilation hoods if the grill is located underneath a covered patio or pergola.
Create a flawless, functional al fresco kitchen by utilizing these design strategies:
-
Select only 304 or 316 marine-grade stainless steel for all appliances, doors, and drawers to prevent rapid oxidation and rust in harsh exterior environments.
-
Design the kitchen layout utilizing the classic “work triangle” concept, ensuring an ergonomic, unimpeded flow between the grill, the outdoor sink, and the under-counter refrigerator.
-
Incorporate extensive, dimmable LED task lighting directly above the grilling station and prep counters so you can safely cook well after the sun goes down.
-
Plan for ample outdoor trash and recycling pull-out bins hidden within the cabinetry to keep the space pristine and keep pests away from the dining area.
Integrating Retaining Walls and Seating Structures
To make your expansive outdoor space feel intimate and inviting, you must create distinct “rooms.” Without physical boundaries, a large patio can feel like an exposed parking lot. You can define these entertainment zones and solve complex elevation issues simultaneously by integrating low masonry retaining walls and built-in seating structures.
A curved stone seating wall wrapped around a sunken, smokeless gas fire pit instantly creates a cozy, highly utilized gathering space that naturally draws people together on cool evenings. These vertical elements provide massive architectural interest, breaking up the flat visual plane of the yard. Furthermore, building permanent bench seating into the walls drastically reduces the amount of loose patio furniture you need to buy, maintain, and store over the winter. Collaborating with a skilled hardscaping contractor is essential to build these heavy vertical elements safely. They will ensure the masonry blocks are structurally locked together and that the veneers perfectly complement the brick or siding of your main house.
Maximize the impact of your vertical structures with these construction tips:
-
Ensure any wall that holds back soil (a true retaining wall) is backfilled with a thick layer of clean, crushed gravel and features designated weep holes at the base to relieve devastating hydrostatic water pressure.
-
Cap all seating walls with wide, smooth-cut pieces of bluestone or limestone with a bullnose edge to provide a comfortable, snag-free surface for guests to sit on.
-
Integrate low-voltage hardscape lighting directly under the lip of the wall caps to cast a beautiful, downward-washing glow that highlights the texture of the stone and prevents tripping at night.
-
Use raised masonry planter boxes built directly into the retaining walls to bring colorful flowers and lush greenery up to eye level, softening the heavy stonework.
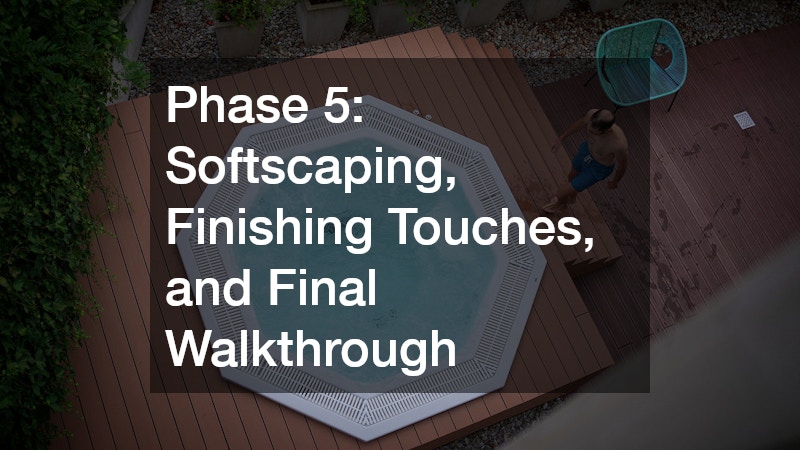
Phase 5: Softscaping, Finishing Touches, and Final Walkthrough
The final phase is where the harsh, dusty construction site is magically transformed into a living, breathing oasis. This phase brings in the organic elements that soften the heavy masonry, provide crucial shade and privacy, and breathe life into the design. It also involves the final protective measures that will preserve your investment for decades to come.
Selecting Climate-Appropriate Flora for Year-Round Appeal
The plants you choose are the soul of your backyard. However, selecting flora based purely on what looks pretty in the nursery is a recipe for disaster. You must choose climate-appropriate, drought-tolerant species that will thrive in your specific soil type and sun exposure. Furthermore, you must plan for the future. A cute, two-foot sapling planted too close to the pool deck today will become a massive tree with an aggressive root system that will eventually heave and crack your concrete five years from now.
A successful planting strategy utilizes a concept called hydrozoning—grouping plants with identical water and sunlight needs together to maximize irrigation efficiency. To soften the harsh, geometric lines of the patios and walls, utilize a mix of ornamental grasses, creeping ground covers, and blooming perennials. For privacy from neighbors, establish dense, evergreen border hedges that maintain their foliage year-round. Hiring knowledgeable landscaping contractors to execute this final planting phase is invaluable. They understand how to properly amend the topsoil you saved during demolition, how to lay down premium, disease-free sod, and how to calibrate smart drip-irrigation systems that deliver water directly to the root zones without wasting a drop.
Curate a lush, sustainable softscape by implementing these planting guidelines:
-
Avoid planting any deciduous trees, or trees that drop heavy berries and sap, anywhere near the swimming pool to drastically reduce your daily skimming and filter maintenance.
-
Layer your garden beds vertically, placing the tallest ornamental trees in the back, medium shrubs in the middle, and low-lying, colorful ground cover at the front edge of the borders.
-
Install a thick, three-inch layer of premium hardwood mulch across all garden beds to suppress aggressive weeds, regulate soil temperature, and retain deep root moisture during the summer heat.
-
Program your automated irrigation controller to water deeply and infrequently in the early morning hours, which promotes deep root growth and prevents fungal diseases from taking hold overnight.
Sealing and Protecting Your Newly Poured Surfaces
With the plants in the ground and the kitchen appliances polished, the project feels complete. However, there is one final, critical step required to protect the massive financial investment you have just made. The beautiful new surfaces of your oasis are highly vulnerable to the elements during their first few months of exposure.
Stamped patios can quickly lose their vibrant coloring due to UV fading. Natural stone can absorb spilled red wine or grease splatters from the grill, leaving permanent stains. The grout lines between your pavers are susceptible to erosion from heavy rains. You must apply specialized, commercial-grade sealers to all these surfaces. It is highly advised to have your concrete contractors return for a final walkthrough to apply a high-quality, penetrating acrylic or siloxane sealer to all newly poured patios and walkways. This final chemical barrier locks out moisture, prevents severe freeze-thaw damage in the winter, and keeps your oasis looking pristine before the first major weather event hits.
Finalize your backyard transformation by executing this ultimate protection checklist:
-
Do not apply sealers to freshly poured cement immediately; wait at least 30 days for the material to fully cure and release its internal moisture to prevent the sealer from turning cloudy.
-
Conduct a rigorous safety audit of all pool fence gates, ensuring the hinges are tightly tensioned and the latches self-close securely from any open position.
-
Have your aquatic professional balance the pool water chemistry for the final time, providing you with a detailed, printed chemical schedule for your ongoing weekly maintenance.
-
Walk the property at night to test the entire low-voltage lighting network, adjusting the angles of the uplights to perfectly illuminate the trunks of your new specimen trees.
Conclusion
Building the ultimate outdoor oasis is not a weekend project; it is a marathon of logical sequencing, strict project management, and visionary design. From the heavy machinery of the initial demolition to the delicate placement of the final perennial flowers, every step relies heavily on the flawless execution of the step that preceded it. By systematically tackling the structural groundwork, executing the complex aquatic installations, building out the entertainment hubs, and curating the organic softscaping, you insulate yourself from the chaos that plagues unorganized renovations.
As you embark on this transformative journey, remember that patience is your most valuable asset. In the world of complex exterior construction, weather delays are inevitable, supply chain hiccups will occur, and there will be days when your yard looks like a chaotic trench. But by trusting the phased process and relying on vetted, specialized professionals, that chaos will soon give way to clarity.
Do not let the scale of the project delay your dreams. Begin gathering your inspiration today. Download a backyard planning checklist, start sketching out your ideal zones, and reach out to local experts to begin gathering bids. With rigorous planning and a commitment to quality, your current patch of dirt will soon become the breathtaking, luxurious retreat you and your family will enjoy for a lifetime.